Thursday, December 5, 2013

Final #6: My Immersive Library


Step 9:  http://langonemt35801.blogspot.com/2013/11/class-12-step-9-final-project-adding-10.html

In Rocket Client my Immersive Library is called "Langone Immersive Library"


The above links will take you to the various steps of my Immersive Library Final in Meshmoon .  It is a final exercise from the Immersive Education course that I am taking at Boston College.  The course is called Discovering Computer Graphics.  For details, visit the immersive BC portal at http://ImmersiveEducation.org/@/bc

Thursday, November 21, 2013

Class #12: Roll Calls


Class #11: WebGL Chrome Experiments the FAIL IN FIREFOX

Worked in Firefox:


Failed in Firefox:

(McPhillips)  http://www.findyourwaytooz.com/ - Crushed my machine. Tons of lag.
(Shanahan) http://www.playmapscube.com/ - Mouse controls wouldn't work for me. Everything loaded though.
(Miranda) http://tron.ebaumstein.com/ - Loaded but nothing happens.
(Andrade) https://www.justareflektor.com/ - Loaded but nothing happens.

Tuesday, November 19, 2013

Class #11: WebGL Chrome Experiments using Google's Chrome Browser

Example 1:  Goo Video Sphere


This is the video sphere.  Users can zoom in and out and rotate all around the sphere.  Each module that makes the sphere is a link to video media.   This is a very unique, and in my opinion, innovative way to present data.

An up close look at the outside.

This is a shot from inside the sphere looking towards the top.

This is a shot of one of the videos that links directly the modules that make up the sphere.


Example 2:  Saint Jean Cathedral of Lyon


This one was really interesting.  This is a model of a real cathedral in France.  The controls are weird but once you understand how to move around it's pretty cool.  This example incorporates thematic music that really sets a deep tone for your visit.  You can also reset the light source to really see how light plays throughout the architecture of the building.  I can see this type of example being very valuable in a virtual world.  Being able to bring a class to the Vatican without flying to Rome for example.

This is a shot of the Cathedral first rendering on my machine.

This is the cathedral fully rendered.  On my PC at home it tooks about 45 seconds to full render.  My graphics card at work couldn't handle it at all.

I placed the light source at the far end of the hallway.

From the altar looking back towards the entrance with a different light source.  


Example 3:  KineMan - Interactive 3D Skeleton


This example is an interactive 3D Skeleton.  I can see value in this application for education and perhaps even art. 

Maniuplating individual joints to try and make a natural pose.

Here I manipulated many joints and the overall angle to make a very uncomfortable looking pose.

Thursday, November 14, 2013

Final #3: Group 3D Building Project

Creating the world for the class to begin building and establishing build permissions for everyone.  My fellow students are arriving.

People have been assigned tasks.  I was assigned to build the structure of the main house.  We first layed out a floor plan and then added some accouterments.

Walls and textures are being added by my groupmates.  Since I have a little more experience then some you'll also notice that I fly around once and while to help others out with different parts of the environment.

Here I am helping Steve finish the garage.  I am also overseeing the placement of the different structures in relationship to the main house.

Roofs are being added to the structures and walkways are coming together.  A soccer court is built in the back yard.

With everything nearly complete I flew around taking screen shots.  Some are of the outside grounds, showing the pool , garage, and bouncy house.  The fireplace inside is also shown.

Some more shots of the finished product.  I even managed to snag a candid with Snookie who stopped by to check things out.  ;)


These are screenshots from our 3D group building exercise in Cloud Party.  It is a final exercise from the Immersive Education course that I am taking at Boston College.  The course is called Discovering Computer Graphics.  For details, visit the immersive BC portal at http://ImmersiveEducation.org/@/bc

Class #11, Roll Call FINAL


Class #11, Learning Ladder Responsibilities


Final #5: 2D Java Video Game

As a student in the MT35801 class, I have previously completed the assignments outlined. Below are links to the appropriate blog posts corresponding with the final exercises for MT35101. NOTE: There are subtle differences within the assignments because in MT35801 we were asked to dig a little deeper into the coding.

FINAL 5a: Greenfoot JoC #4 Finally some code!

http://langonemt35801.blogspot.com/2013/10/class-5-assignment-1-greenfoot-joc-4.html

FINAL 5b: Greenfoot Lettuce and Snake

http://langonemt35801.blogspot.com/2013/10/class-6-assignment-1-greenfoot-joc-5.html

http://www.greenfoot.org/scenarios/9608  (Game in Progress)

FINAL 5c: MY CUSTOMIZED JAVA GAME

http://langonemt35801.blogspot.com/2013/10/class-8-assignment-2-adding-scoreboard.html

http://www.greenfoot.org/scenarios/9720  (Final Game)


These are various iterations of my journey through the Joy of Code web series.  It is a final exercise from the Immersive Education course that I am taking at Boston College.  The course is called Discovering Computer Graphics.  For details, visit the immersive BC portal at http://ImmersiveEducation.org/@/bc

Final #4: High Resolution Avatar

The following link will take you to my other blog post detailing a high resolution avatar using Makehuman.

http://langonemt35801.blogspot.com/2013/10/class-10-assignment-4-making-virtual.html


This is the high resolution avatar I created using the Makehuman tool .  It is a final exercise from the Immersive Education course that I am taking at Boston College.  The course is called Discovering Computer Graphics.  For details, visit the immersive BC portal at http://ImmersiveEducation.org/@/bc

Final #2: Six Monocular Depth Cues

The following link will take you to my other blog post concerning Monocular Depth Cues:

http://langonemt35801.blogspot.com/2013/09/class-2-assignment-3-six-monocular.html

These are examples Monocular Depth Cues used to increase immersion within 3D generated environments.  It is a final exercise from the Immersive Education course that I am taking at Boston College.  The course is called Discovering Computer Graphics.  For details, visit the immersive BC portal at http://ImmersiveEducation.org/@/bc

Final #1: Flash/Powerbullet .swf Files


https://wfs.bc.edu:443/langonea/C8_A4.swf

These are examples of Flash files created using the Powerbullet tool.  it is a final exercise from the Immersive Education course that I am taking at Boston College.  The course is called Discovering Computer Graphics.  For details, visit the immersive BC portal at http://ImmersiveEducation.org/@/bc

Class #10, Assignment 3: The Education Grid


Clicking on the screenshots provided will take you to the main page of the The Education Grid (TEG).  TEG is a persistent online community for educators and students that enables a safe, secure, interactive learning environment.


All details regarding legality, security, mechanics, and cost (it's FREE) are detailed in the "About" section.

Class #9, Assignment 3: WebGL Overview

Source:  http://en.wikipedia.org/wiki/WebGL

          WebGL stands for Web Graphics Library.  WebGL is a technology that allows for the rendering of 3D graphics in real-time, directly within your browser.  It is an image library that is programmed with Java enabling greater usage of a computer's Graphics Processing Unit (GPU) to display the graphics without the need for downloading more plugins.  WebGL is a popular medium with advertisers creating engaging visuals for a target audience.  GoogleMaps is an early example of WebGL technology at work.
          Some limitations for WebGL exist at this time which can prevent access for some users and audiences, but with technology advances on the web this lack of access should be short lived. The major limiting factors come in to play with people who use older computers  or web browsers to access the internet.  WebGL requires HTML 5 and a reasonable GPU.  Users operating with Internet Explorer versions prior to IE11 (released 17 October 2013) will have issues using WebGL.  Those using browsers such as Mozilla and Chrome should be good to go.

Tuesday, November 12, 2013

Class #9, Assignment 2: Building in Cloud Party

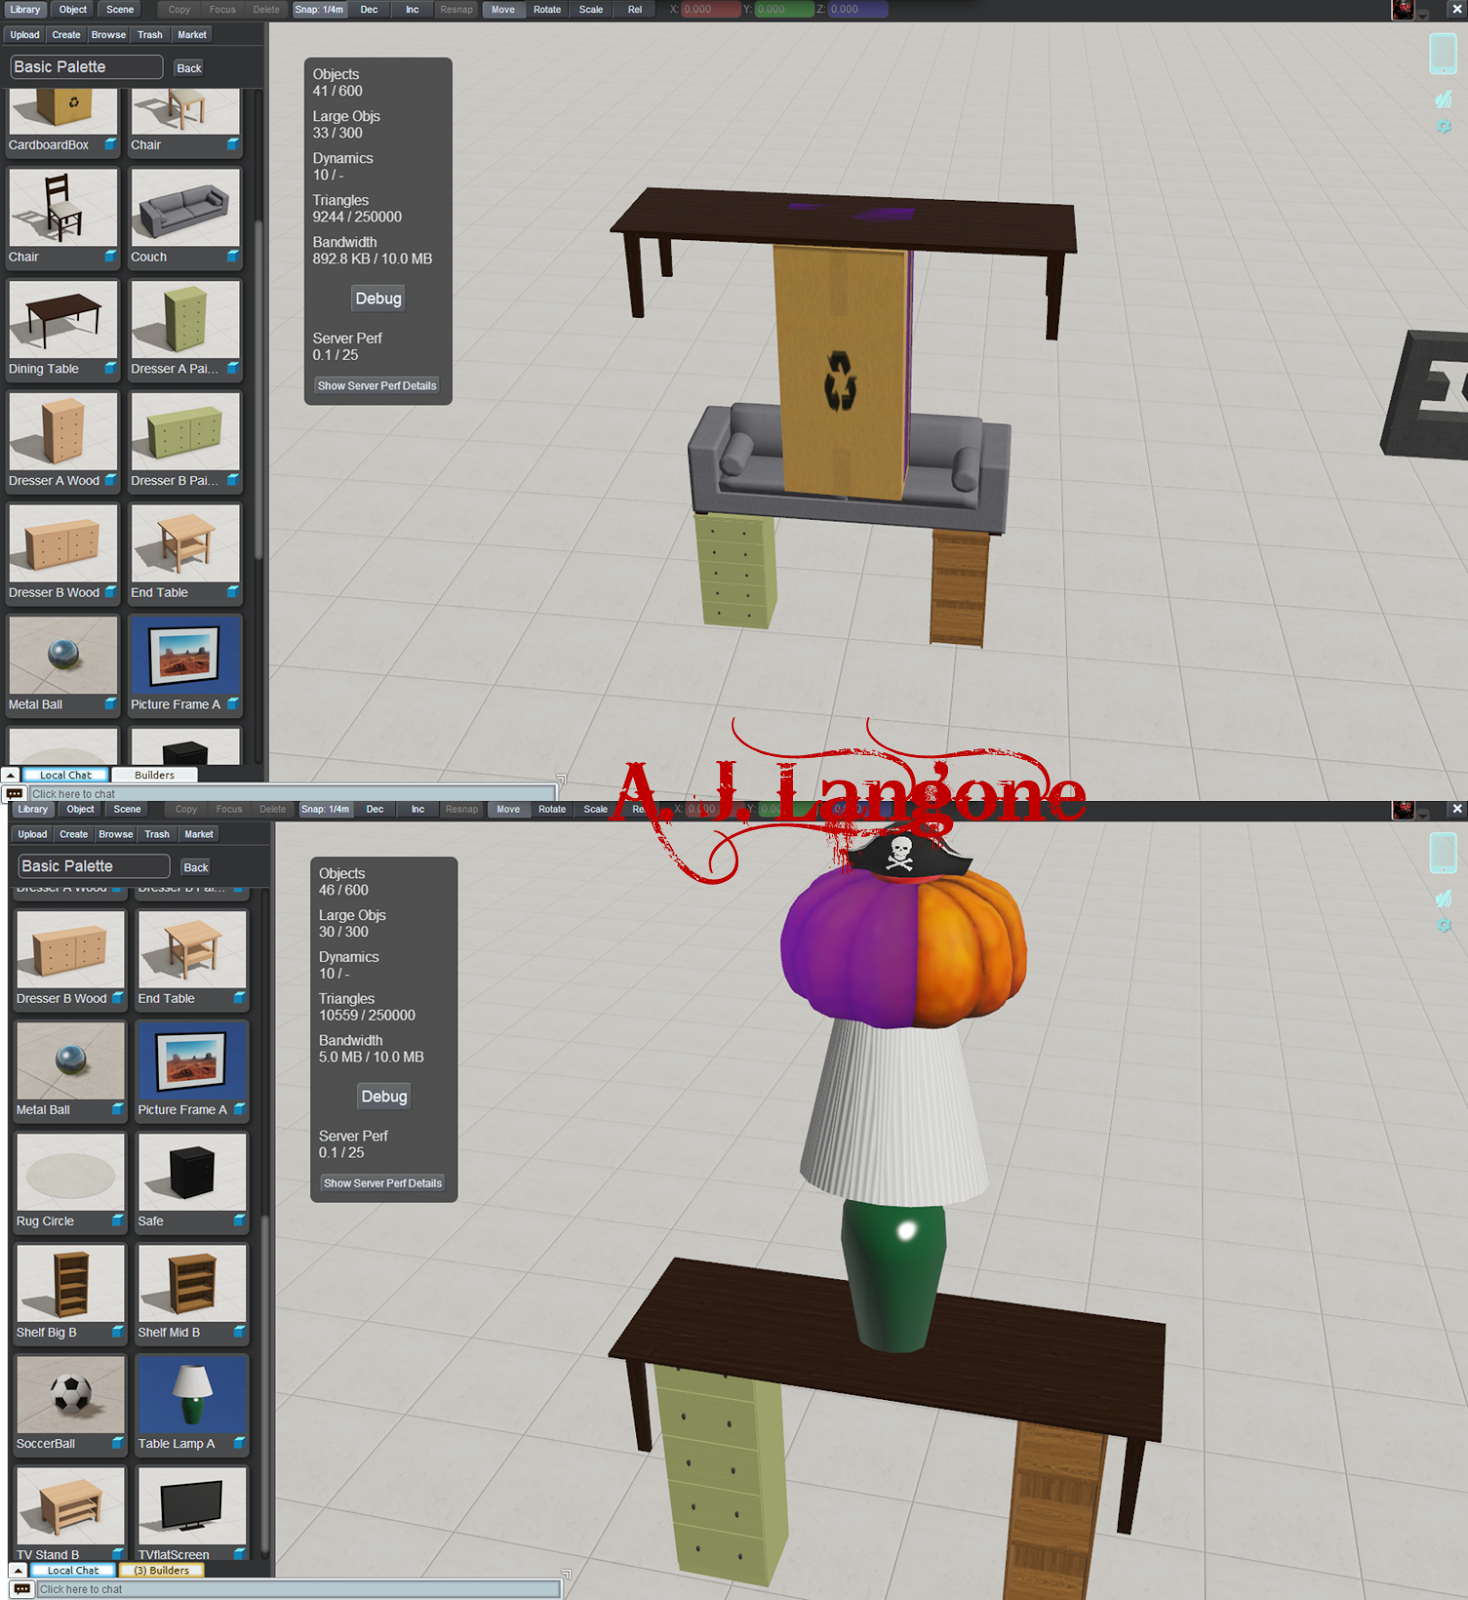
These are the final images of my Cloud Party building exercise.  Think of it as a furniture Scarecrow.  Materials include:  Book shelf, Dresser, Safe, Lamp, Chair model 1, Chair model 2, Pumpkin, Pirate Hat, Candy Apple, Table and Circular Rug.


Despite the selective gravity in Cloud Party, I was able to somewhat sit in this chair.  


After using both OSGrid and Cloud Party to build things I would simply state that they are both adequate for their user base.  OSGrid is more advanced and as such, has more advanced tools, capabilities, and control for building objects than Cloud Party does.  You can literally create almost anything.  Cloud Party has more limitations and less control, but in exchange, users get a faster, more smooth experience without having to download third party applications.

**_____ Work in Progress _____**

I went through various iterations of objects when trying to build my scuplture.  Certain objects in Cloud Party were subject to gravity and kept crashing down when i'd place them.  I had to ditch the couch in order to balance my objects more effectively.  For some reason though, the chairs could be stuck to a pumpkin. 


Class #9, Assignment 5: Guide to Getting Started with OSGrid

https://docs.google.com/document/d/190_VaALpQBhUrPqJVWwEErqStlWD5u8J6qf8qkmrFqI/edit?usp=sharing

The bove link will take you to the guide I created to assist the class with Building a Rocket in OpenSim. 

Thursday, October 24, 2013

Class 7, FINAL PREPARATION: Choosing a JavaScript programming track

Codecademy:


I have some prior experience with Codecademy from the Collaborative Computing class I took last year at BC. I revisited the site for JavaScript practice and found it to have some upgrades. They improved the interface and made everything clean and easy to navigate. I find Codecademy to be extremely user friendly for beginners, but it is possible that I am biased from my previous experience. The website is smart and dynamic, allowing a user to pick up where they left off with ease. It even had my old results and code still present from when I covered other programming basics last year, which I thought was pretty cool! Codecademy also appeared to offer more of a variety of programming languages to learn compared to LearnStreet or Khan Academy.


LearnStreet:

LearnStreet possesses a similar interface to Codecademy, which for me, made it easy to dive right into. I particularly liked how robust each lesson is, yet also how they are not forcing you to read through information you feel you can overlook. The overviews, tutorial videos, and glossaries present within each lesson are really helpful for beginners. The addition of a bit of nerd humor in some of the JS Console's remarks is also a nice touch. Programming can be frustrating so it's nice to smile at a bad joke once in a while. It was also a bit too simple at times. Not having a separate programming display window made me sort of just blow through the exercises while not retaining as much as I should have. Step. Done. Step. Done. etc. The color coding was well done, however, which aided with sifting through all of the onscreen clutter towards the end of an exercise.


Khan Academy:

Khan Academy immediately struck me as being marketed for a slightly more advanced audience. Not so much so that it is insurmountable to a complete beginner, but it could be off-putting. I had to search around to confirm that the only programming done through Khan Academy was indeed, JavaScript. There did not seem to be options for anything else. I did not like how Khan Academy's training interface was set up. Having to watch and pause videos in order to work in a shared space with a virtual author was really obnoxious. Also taking directions from a child's voice was a bit demeaning. I did not feel like I was able to be hands on enough with this throughout the lesson. I honestly struggled a bit having to switch back and forth to the video and the exercise. Over time I was able to adapt to the interface, but I really wouldn't recommend this to someone who's completely new to programming.


Conclusion:

To briefly conclude, I would say that all three sites are accessible to fledgling programmers. In order of accessibility from easiest to most complicated I would say that LearnStreet is the simplest to use and get started, followed by Codecademy, and then Khan Academy. All three make it easy to sign up and get started, however. I signed up using my Gmail account and was beginning lessons in less than 30 seconds. I think patient folks will get the more out of Khan Academy than the others, but for someone to looking to learn programming basics in a shorter amount of time, I would recommend Codecademy. I think it offers a beginner friendly experience with a better training interface and a lot less frustration. If I could only choose one resource going forward, I would stick with Codecademy.

Thursday, October 17, 2013

Class #7, Roll Call 2


Class #7, Step 2

Step 2a: Selection Tools

No image required!

Step 2b:  Stroke


I used the Stroke function, under the Edit menu in order to paint the borders of various selections.  Note the pattern stroke on the selection in the clouds.

Step 2c:  Paste Into

The above screenshot illustrates the Paste Into function in GIMP.  I used two different selections on the image and then copied the BC Eagle to my clipboard.  By using the Paste Into function, I was able to place the logo into the selection, rather the into the image as a whole.


Step 2d:  Transparency

The two Eagle in the lower left are examples of using the Transparency Function in GIMP.  The Eagle on the Left is at 75%, while the Eagle on the Right is at 50%.

Step 2e:  Text

Fun with Text!  Each text block has a different Transparency setting starting at 40%, 50%, 60%, etc.  Different fonts and sizes were selected as well.

Step 2f:  Scale

This was done preserving aspect ratio.

This was done by not preserving aspect ratio.  It just so happens that I had made this image a clean 1024x1024. So when I reduced Height and Width by half, they come out the same regardless.